Maybe you feel the layout feature to add widget in blogger is very less, making it difficult for you if you want to add a widget that much. However, in the following ways, all can be resolved easily. You can add layout to the widget wherever they pleased. Well, here means multi-column layout can be divided into 1 column, 2 column, 3 column or 4 column, 10 columns could even, hahaha ..... All depends on your needs.
Ok, for those of you who wish to reproduce the column space on the layout of the footer template. Immediately wrote us started:
1. Login ke Blogger. Klik Design -> Edit HTML
2. Backup your template by clicking on Download Full Template so that you can restore your template to its original state if the results are not satisfactory.
3. If so, look for the code ]]></b:skin>
4. Add the following code above the code ]]></b:skin>
#footer-column-divide {5. If so, look for the code below.
clear:both;
}
.footer-column {
padding: 10px;
}
<div id='footer-wrapper'>6. Add the following code under the code
<b:section class='footer' id='footer' showaddelement='yes'/>
</div>
atau
<div id='footer'>
<b:section class='footer' id='footer' showaddelement='yes'/></div>
<b:section class='footer' id='footer' showaddelement='yes'/> or <b:section class='footer' id='footer' />
If you can not find the code <b:section class='footer' id='footer' showaddelement='yes'/> then just add the following code below <div id='footer'>
If you want to make 2 columns footer. Use the following code:
<div id='footer-column-divide'>
<div id='footer1' style='width: 50%; float:left;
margin:0; text-align:left;'>
<b:section class='footer-column' id='col1'
preferred='yes' style='float:left;'/>
</div>
<div id='footer2' style='width: 50%; float: left;
margin:0; text-align: left;'>
<b:section class='footer-column' id='col2'
preferred='yes' style='float:left;'/>
</div>
<div style='clear:both;'/>
</div>
If you want to make 3 columns footer. Use the following code:
<div id='footer-column-divide'>
<div id='footer1' style='width: 33%; float:left;
margin:0; text-align:left;'>
<b:section class='footer-column' id='col1'
preferred='yes' style='float:left;'/>
</div>
<div id='footer2' style='width: 33%; float: left;
margin:0; text-align: left;'>
<b:section class='footer-column' id='col2'
preferred='yes' style='float:left;'/>
</div>
<div id='footer3' style='width: 33%; float: right;
margin:0; text-align: left;'>
<b:section class='footer-column' id='col3'
preferred='yes' style='float:right;'/>
</div>
<div style='clear:both;'/>
</div>
If you want to make 4 columns footer. Use the following code:
<div id='footer-column-divide'>
<div id='footer1' style='width: 25%; float:left;
margin:0; text-align:left;'>
<b:section class='footer-column' id='col1'
preferred='yes' style='float:left;'/>
</div>
<div id='footer2' style='width: 25%; float: left;
margin:0; text-align: left;'>
<b:section class='footer-column' id='col2'
preferred='yes' style='float:left;'/>
</div>
<div id='footer3' style='width: 25%; float: right;
margin:0; text-align: left;'>
<b:section class='footer-column' id='col3'
preferred='yes' style='float:right;'/>
</div>
<div id='footer4' style='width: 25%; float: right;
margin:0; text-align: left;'>
<b:section class='footer-column' id='col4'
preferred='yes' style='float:right;'/>
</div>
<div style='clear:both;'/>
</div>
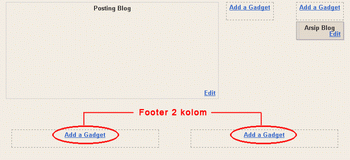
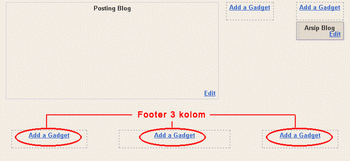
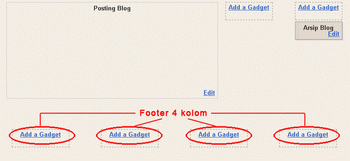
7. If so click Save Template. Then click the Page Element. If successful, the result will be like this.
Footer 2 column

Footer 3 column

Footer 4 column

* For one you can change the column width to be width: 100% and float: center;
* For 10 you change the column width to be width: 10% and you can adjust the float.
Trying Safe. . . .


 1/09/2013 05:51:00 PM
 hugetuget

 Posted in:


0 comments:
Post a Comment