Tuesday, February 18, 2014

Creating Portable Charger / USB Powerbank Using the Remote Control Battery 9.6 Volt


As per the title of this post , I share a tutorial to make a charger hp / portable phones that term cool Powerbank : D.
Starting from battery sony ericson K510i already convicted ngedrop constantly looking for ideas to make my brain without having to buy a new battery .
Because many rechargeble battery ( rechargeable ) unused tamiya former had thought to use it .
But that desire is gone when I saw the long battery RC untouched .
Finally, the decision falls on the RC battery is 700mAh capacity of approximately 1.2 volts . More practical than tamiya batteries are still pritilan : D.
RC amounted to 8 cell battery , so the total is 1.2 volts x 8 = 9.6 volts . And 700mAh x 8 = 5600mAh . Or 5.6 Ampere . Wow . . .
Why even counted - itungan yaa ? : D . .
Do not let me know papa mama was little . . : D
The question How do you let the battery aka RC Remote Control ( not yellow, you know that box ! ) Can ngeces hp ?
Not clay deh hp charger adapter directly from the electricity it says input : 100 - 240VAC ~ 100mA , 50 - 60Hz
Output : 4.9 VDC ~ 450mA
See the output , because that's all we need is 4.9 VDC ~ 450mA .
Compare with RC battery 5600mA or 9.6 VDC ~ 5.6 A. Much larger RC battery right? Imagine if you directly for hp charger , your phone will be damaged even fire ! ! Eat do not mess with electricity if you do not understand ! ! : D
Some there are 3 RC battery cables red , blue , black . Just use the same red- black .
And what next? Yes we turunin voltage of 9.6 VDC 4.9 VDC Being let's easy 5Volt DC .
Why not 3.7 volts ?
That's the capacity of the battery so we used above but not too big hp power ic jebot later : D .
I use the IC AN7805 Regulator LM7805 or other important or 7805 .


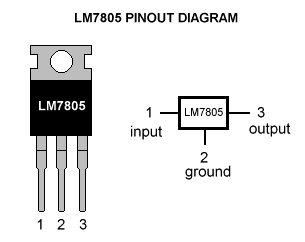
Since my K510i hp charger adapter generates the amperage 450mA for ces hp, then I use LM78M05 Regulator IC. But given MC78M05C electronic stores.

Never mind the important 78M05, letter manufacturer code in front.

If your adapter hp more than 500mA use only the 7805.

Skemannya following:

LM78S05: 2A

LM7805: 1A

LM78M05: 500mA

LM78L05: 100mA

Code 05 indicates the voltage was lowered to 5volt.

There are LM7809 means 9volt and others. Minimal input 7volt 7805, if less than 7volt not be stable. Maximum input to the IC 78xx 30volt battery so it could still use a 12volt motor 5A. But do not forget! Put the heatsink so that heat reduces the IC, if the need for a DC fan. If it does not heat the IC can make fried eggs sunny side up half-baked ... : D

Now prepare the materials components:
- bateray RC 9,6Volt
- saklar
- IC Regulator 78m05
- D1, dioda N4002
- C1, capasitor 100uf/50v
- C2, capasitor ceramic/milar 100nf , kode : 104
- R1, resistor 180 ohm
- D2, LED 2-3volt
- PCB Matrix
- Port USB Female
- Heatsink


After that raft components on the board pcb with circuit schematic flow matrix as below.


Note the installation of D1 and D2 do not reverse. And also do not be reversed C1!. Once done tests with a multitester or avometer.

The appearance got me:

After that my raft back into a flashlight by adding 2 leds, the result is like the picture above.


UPDATE 10 Februari 2014 :
Because a lot of comments asking, then today I decided to update this post.

below there are a series of schematic drawings which have dimodif to be like the picture at the top of this post (no additional DC Jack and 2 LED lights as a flashlight)
Here's his statement:

R2 = 180ohm-1K (it is up to you how much love, the less Ohmnya the brighter lights)

D3 & D4 = LED Lighting White color

As the DC jack connector between the Adapter 10volt battery POWERBANK

switch

Can you create a physical form at will, I just made ​​the above scheme groove.

If there are not clear can be asked to comment below.

How to Fix The TV Remote Button Not Working

 
Television or TV used to be called an electronic medium that is almost there in every home. Either large or small electronic device is loved by the children, teenagers, to adults. .

We see the television to find out information, infotainment, entertainment, etc..

While watching TV we often use the remote to change the channel, volume and other. As a result, remote key be hard pressed not even function normally. Sometimes we also push the button too hard to be enabled.

The cause of the remote buttons do not function when pressed due to the electrolyte carbon rubber and pcb is thin or missing, but sometimes it can also be caused by dirt.

If dirty, you can membersihkanya with a brush or rag. If carbon is up can be added with 2B pencil. Way to stay rub on the surface of the pcb and black rubber.
If the above method does not work, replace the electrolyte with carbon carbon diremot other unused . Or you can also get me on a used game ps sticks , calculators , children's toys , which is important as there is a remote button . If I normally take in a calculator .
If you do not have these electronic devices , can replace it with a thick paper that has been etched with a 2B pencil .
Once you get a replacement carbon , scissors live according to the form of carbon that exist on the remote rubber button .
Then you use rubber cement glue , make sure not loose . Once the glue is dry lid remote as before .
Constraints can I repair a broken tv remote , the remote when opening the lid until prying with screwdriver . Electrolyte and carbon black .
The steps above you can also apply in the sticks PS , video games , DVD player remote , remote ac , game pad , calculator , computer keyboard / PC , cell phone / mobile phone , etc. .
So hopefully useful for you all , please leave a comment if anyone wants to ask .

How to Clean the Sality virus is stubborn in Computer Until Completed

Before getting into the topic we discussed beforehand what it is virus win32 sality or other names : salicode , W32/Sality.AE , win32.sality , sality.101 , win32.hllp , win32/sality.z , win32/sality.ag , win32 / sality.aa and so on .Sality virus has been born since 2009 or earlier and many computer pc infected by it . Sality is a virus that is the most difficult to clean because Sality infects the installation program and the file extension . EXE , . COM , . SCR on all hard drive partitions mainly drive C :/ program files and autorun.inf .Once infected you will not be aware if your computer has been affected by Sality , because the setup program file extension . Infected EXE look the same as the original . Only the size of the increases gained a few kb only.If the file has been infected with the run ( click 2x ) , then the program files can go on as usual . Moreover, the already installed can run normally .

Feature exposed sality :- Can not copy and paste- Disable such a system folder option , task manager , regitry editors , antivirus , firewall- Can not install antivirus- The existence of a strange file with random posts . Pif- Can not enter safe modeAbove characteristics Sality virus is too severe , if not worse there is only the odd random files . Pif .My own laptop was infected with a low level not severe . But do not rule could be cleaned 100 % .

Planning :
- download Avg Cleaner (rmslt) - Mirror
- download Kaspersky cleaner (salitykiller) - Mirror
- download Avast cleaner (aswcleaner) - Mirror
- download Repair registry - Mirror
- download PCMAV 9.5
- download norton malware cleaner
- download wise registry cleaner
- downlaod wise disk cleaner

Files downloaded above anyone I rename the additional number 1, with a goal if the original file can not be executed because it is blocked by Sality, then I run to rename the additional number 1 behind.

The steps are:

1. Turn off the Internet, as if connected to the Internet sality will download his friends and eventually multiply.

2. Turn off system restore, autorun, if necessary, disable the administrator but you have to run this program under dg right click run administrator.

3. After downloading run Avg Cleaner in RAR. If there are the commands to restart (boot scan) did.

save the log , Later he will continue scanning before entering the windows . This process can be a bit old to 4 hours depending on drive capacity is unused c . I count 4 hours because of used space C: drive of my 59GB . After completion will enter the window .4 . Run again the AVG cleaner . There will be a total scan of the hard drive partition after the C: drive is complete .6 . While scanning process running 1 hour late or more . Run kaspersky cleaner ( salitykiller ) in cmd ( click 2x lgsg wrote Because I have to change. Cmd .Wait for it to finish , then I stay up all night .7 . The next day was finished , continue scanning with 9.5 PCMAV run in the rar . Scan only drive C : Only.8 . After completion of the repair registry extract repair.inf right click install .9 . If msh not satisfied anymore with Avast Cleaner scans10 . If not satisfied with norton malware scan again nutmeg cleaner until you see him dizzy . : D11 . The last step to run a registry cleaner wise and wise disk cleaner . Clean up . .I have done way above and completely clean of viruses Sality and other viruses .Files . Exe that has become infected will change format . Tmp . Remove it. Because it can not be cured .Good luck . .

How to Make Easy Powerbank / Charger Portable Rechargeable AA Batteries Using 4 pieces

Now again the rise of smart phones with very cool features , let's call it a smartphone with a reliable operating system displayed very comfortable in the eyes . With operating systems are so powerful , it is not uncommon smartphones more electrical energy from the battery drain . So we had to commute HP charger , it is very inconvenient if you have to carry a charger electricity , especially when away from the reach of the power source .
To get around it made ​​POWERBANK , well here I there a way to make POWERBANK very easily without any additional electronic circuit components , a simple one .
Let's look at the steps in making it .
1 . Prepare 4 pieces of rechargeable batteries or rechargeable with amperage up to you . But here I use the 700mAh . Customize your phone with a innate charger . Usually written output : 5 volts :: 550mA .
For class smartphone battery usually more than 1000mAh/1Ah .
2 . Prepare 4 pieces of the battery compartment . If you do not have to buy the electronic stores .
3 . Prepare cable , usb female , solder , tenol , multitester , and others .
4 . 4 Make sure the battery is fully charged . Then put the battery in the right direction .
5 . Connect the cable from the battery to usb female , or can be directly soldered to the battery compartment . Be sure not a wrong number . See the image below:


Note the positive current (+) and negative current (-) of the battery connected to the usb not to reverse, check first with each cable multitester really sure, do not dwell pd cable colors.

Usually the USB 2.0 cable wires are 4 colors, namely black, white, green and red. But sometimes there is no green replaced blue. Well, if you are confused to focus on the colors red and black wires alone. Because the color of the other for data transfer, red and black for power / power. Usually the red color symbolizes the flow of positive and negative current Black / Ground.

So if you are confused directly connect the positive pole of the battery to the USB cable and the negative pole of the Red color to black.

Pole Positive (+) and negative (-) battery usually in as shown below:


6. Tests with multitester if the current is correct. If you are sure, can directly plug into your phone. If successful the phone will be charged.

The explanation:

-Batteries with greater power will flow to the smaller electric power.

-1 Rechargeable batteries with a capacity of 1.2 ampere-volt variety. If 4 pieces of batteries in series means there are 4.8 volts and amperes fixed. Do not use regular batteries due to voltage of 1.5 volts and amperes small.

-If the mobile phone battery is not charged, you can try adding 1 rechargeable batteries again. So in total there are 5 pieces.

The top and bottom of the picture is the result that I have created and successfully charge the Sony Ericsson K510i mobile phone battery to full.


If you've managed to charge the battery into the phone, cables can you can trim them with soldered directly to the battery terminals, or your insulation is neat.

-Be careful in the making!

Risk-borne

-If there is not understand, please leave a comment below

-Good luck!

How Important Files Data Hiding in Android Smartphone

In modern times, as now HP are increasingly sophisticated and more advanced technology.

The developers of the application was also contributed some of its applications as needed.

Examples of such applications to conceal confidential files, such as photos, videos, documents, and so on.

Actually a lot of applications to hide important data, but I have used named FileHideExpert.

The application is quite good at hiding the file because it is equipped with a password.

Please if you want to try in your smarphone can download the apk file it below:


DOWNLOAD :

HideMe Applications to Hide Files or Folders in Mobile Java J2ME


Maybe it's very old school yes java mobile operating system, but for those of you who still use it on my own as well as long-lasting battery and want to hide something in your phone. Maybe I give this app can help.

His name hideme application. Hideme able to hide files such as pictures, videos, files folder even though it can be hidden. He adds with a pin / password, then the file will be safely hidden. How to use it is also very easy.

If you want to try it you can download it at the link below.

Lisensi : Freeware
Size : 84KB
Format : jar

DOWNLOAD :

Internet Download Manager (IDM) 6.19 Build 1 Full Version

Internet Download Manager (IDM) is a download manager software that is used to speed up and stabilize the files being downloaded. So file to be downloaded more quickly completed. IDM also features resume download resume function next time.

Internet Download Manager (IDM) has been present the latest, version 1 build the final 6:19. To become a full version of IDM here I share the latest patch, the patch can be used in this version to make IDM full version. Turn off your antivirus before install.


What's new in version 6.19 build 1?
(Released: Feb 05, 2014)
  • Improved IDM download engine
  • Added support for Firefox 29 and SeaMonkey 2.24
  • Fixed video recognition problems in Google Chrome
  • Fixed problems when taking over https downloads in Google Chrome


  Lisensi : Full Version with Patch
Format : RAR
Size : 6,3 MB 
DOWNLOAD :

 Activation step

  • Install the IDM, then exit If SERIAL NUMBER Ask, IN EXIT
  • Patch right click select who to 3, select Run as administrator
  • then click PATCH, enter any name in 2 times
SOLUTION FAKE SERIAL number IDM
  • Open the IDM installation directory, c / programfiles / internet download manager
  • first exit, the IDM is in the system try (near the clock)
  • search "IDMGrHlp.exe", please at RENAME be "IDMGrHlp_old.exe"
For the experienced problems 1 FILE NOT FOUND
  • Download " IDMGrHlp.rar" => IDMGrHlp.rar    
  • extract, and copy to c/programfiles/internet download manager
  • Restart again

Make Your Own LED 12 volt Lights for Motorcycles

Now the technology is more advanced, so did the light. Ancient halogen lamp with yellow filaments are still popular, but now has been replaced with white LED lights and TL lighter and power-efficient. LED lights also give the impression of luxury on your motorcycle.


If you want to feel the white light on the front or rear headlights, brake your bike, maybe my post can help this time.

LED lights on motorcycles was already available motorcycle accessories stores, but if the results are not satisfied you can experiment yourself to make the LED light assemblies.

How to make your own LED lamp is very easy. The cost is also very affordable.
Let's look at the steps in making a series of LED lights 12volt motorcycle

Required :
- White color LED lights 4 pieces
- Resistor 330 ohm 2 pieces
- Former halogen bulbs
- Solder, tenol, multitester, adapter 12volt


After all the ingredients are ready, raft LED lights as shown below :

The flow of the circuit like this :


If completed assemble, test the lights with 12volt adapter is on or not with 12-volt adapter.

Make sure the LED lights in the correct installation, if reversed the positive pole (+) and negative (-) it, the lamp will not light. If the resistor is not the opposite problem.

There are actually 2 series. The circuit consists of resistors 1 and 2 LEDs in series.

If still not bright, you can make 3 series (6 LEDs) or more. Or you can substitute smaller resistor values ​​like 270 ohms, but will not be long lifespan LED.

A few tips from me, if there is less clearly understood and not be questioned via the comments below.

 
Design by Blogger Theme | Bloggerized by Free Blogger Templates | Suported News Beritabacaan